

ENERGIZED! Power to Bare Land - Part 2
- Nurse Karl
- Jan 28
- 6 min read

26 May, 2021
Power to Bare Land, May 2021
We purchased 20 acres of bare land in North Idaho and are in the process of developing it to be our future home. When we started this endeavor, we were so excited to find a beautiful piece of land that is nearly all usable on rolling hills and near lakes and rivers. And then, we were stumped…where do we start? What comes first: water or power? So many questions and the more I researched, the more questions I had.
I am happy to say, we are now making more progress and would like to share our experience with you. This is definitely a huge project. We continue to learn during this process. At first, it seemed like things were not moving fast enough, but now, I sometimes feel like an avalanche is coming…
Last October, I applied for a power permit and applied for power install with the local power company. I was told that there were 80+ installs ahead of me. Since work stops once the ground freezes, I was a bit discouraged. Once the ground thaws, the ground would still have to be dry enough for large trucks to pass safely. There is a power pole across from my property with a transformer, but there would need to be a pole on my side of the road. Trees would have to be cut down to make room for the pole.
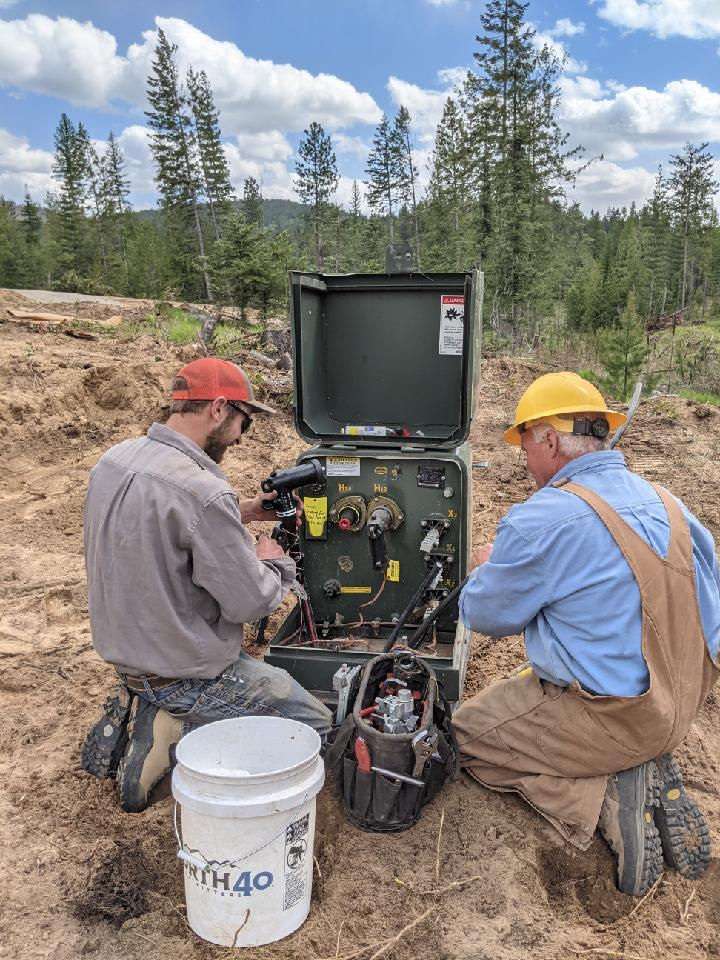
We received a contract from the power company and an engineer called us in November. We discussed what needed to be done. We had the option of hiring an electrician or DIY it. We chose to do it ourselves and we received instructions on how to set up a 400-amp meter box. The standard house is 200 amp, but we plan to have a shop in the future and wanted the extra power option. There was no difference in price from the power company, it was more a matter of cost of materials for us to install the meter box. And it is more cost effective to do it now than to try and add it later. We shopped online for the meter box and parts and called the engineer a few times with questions along the way. He said he would meet us in May when we were in the area again.
In May, 7 months after we started our journey for electricity, we had a power pole. Next, we had to set the meter box. Our power company engineer came out to meet us and we discussed what needed to be done. Simultaneously, we are having an excavation team clear trees and stumps and make pads for the house and shop, but that will be a different post. I also asked them to clear a path from the new power pole to the meter box.
There are a couple of things that we could have done differently.
As the driveway is being shaped, road fabric is being laid down and then rock is being poured on top to decrease dust and to provide better access for the builders. As our excavator team was working, we were setting the poles for the supports for the meter box at the same time. The driveway was done up to where the meter was to be placed across from the house build site and the next rock delivery was soon to arrive. Our excavator operator trenched out across the driveway so that we could bury the 3” schedule 80 PVC pipe which would bring power to the house. We buried 2 long tubes which crossed under the driveway, each with elbows facing up. The 2 conduit lines were set and buried and ends covered to prevent dirt from getting inside. (Later, we were advised that we should not have buried these before inspection). Once the dirt was set on top and compacted, the road fabric was laid over and gravel could be poured on top. It was a bang up job, the gravel delivery was waiting to drop the shipment. I was talking with him and wasting time until the hole could be covered up.

LESSON 1. The conduits were too close. There are 2 conduits that go under the driveway and end up on the other side, 1 for the house and 1 for the shop. There is 1 other one that goes straight down which will be the power line coming in from the power pole. We buried the 2 going under the driveway, a bit too close to each other and one was leaning into the other. Not impossible to fix, but we had to do a lot of digging around and maneuvering to do to get them to fit into the box. Once it was all done, looking at it, we could see how the conduit was not straight and strained to meet the box. We spent a whole other day, digging out the poles and moving them to meet the conduit better. Good thing we had our own excavator. We dug new holes where they should have been to meet the conduit better and used the excavator with straps to pull up the entire setup and re-set the 6” round, 10-foot poles. (we were advised later that normally, the power company likes the 6 x 6 square lumber)
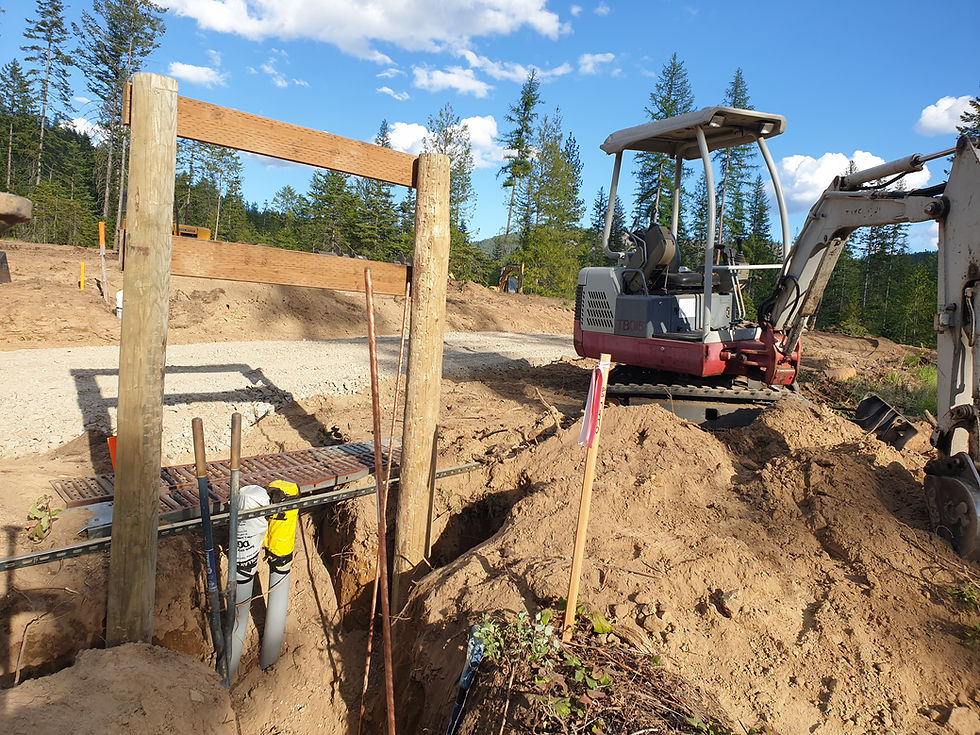
LESSON 2. Next, there is a metal anchor strip that the conduit will be secured to. We didn’t realize initially that the conduit lines coming out of the box are not the same distance from where you will need to secure them. 2 of them are, but the 3rd one is farther away. This is because the 3rd one to the mainline may be as big as 4” pipe. We used 3” for all three, so we had to get an anchor strip with a higher profile.

LESSON 3. The 2 to the house and shop, a well as the 3rd conduit to the main line, all require slip joints that will go up and down as the ground contracts and expands with weather, something that is not needed in warmer areas. We pre-planned everything. PLATT in California does not carry such items, so we ordered and had them ready for us in Idaho. Come to find out, the local Home Depot stores carry slips joints. We set the slip joints on top of the conduit elbows coming up. Once everything was put together, we realized that the slip joints needed to be above the ground and not buried to work properly…another day was spent cutting them off, adding spacers and elevating them to be above ground.

In the end, it looked great. We called the electrical inspector from Dept of Building and Safety and he was able to come within days. He said it looked fine and was able to give us general information on how to make a temporary power supply box for the builders and maybe and RV. I had a couple of electricians in mind from reading reviews and Facebook posts, but we have decided to try and do it ourselves. The inspector is not allowed to give any recommendations at all. Our meter box was APPROVED and he stuck his official sticker on our box! I had already talked to the power company ahead of time and they knew I was working on this. I called them right after I got the approval from Dept of Building and Safety and they came the same day! They were waiting to hear from me and the crew was eating lunch. The job was completed in a few hours. Their guys trenched and laid line, a separate transformer was set, and our box was energized.

So, if you are ever in this position, I would recommend planning ahead, set the meter box and conduit before burying it in the ground. Make sure the slip joints are above the ground level. All together it took us 3-4 days, including the 2 extra days for do-overs. Part of the length of time it took
is that the nearest store with the parts we need is 30 minutes away one way. The power company bill was about $12K for the new power pole, trenching, new line, transformer, and connecting to our meter box. We spent about $2600 on the meter box, conduit, wood, brackets, and etc. and our labor was Free.
We continue to love our own piece of Idaho so very much! ONE HUGE STEP DONE…WE HAVE POWER!
-May 2021


Comentários